Pushing realtime Sensors data into ASA & visualize into Near Real-Time (NRT) PowerBI dashboard– frontier of IoT
July 2, 2015 Leave a comment
As per as the last demo on IoT foundation stuffs, we’ve seen how it’s possible to leverage the real-time data insights from social media datasets like Twitter with some keywords. In this demo, we are trying to pushing realtime sensors data from Windows Phone device to Azure Stream Analytics (through Service Bus EventHub channels) & after processing in ASA hub publishing out to realtime PowerBI dashboard or near real-time analytics(NRT) on PowerView for Excel by pushing out ASA events to Azure SQL database through Excel PowerQuery.
An overview of n-tier architecture of ASA on IoT foundation is like this:
While, IoT always enables customers to connect their own device on Azure cloud platform & bring out some real business value from it, whether it produces #BigData or #SmallData.
Another topic is pretty important is to get insights from Weblogs or telemetry data which can bring out good sentiment, click stream analytics values with machine learning.
Here goes a good high level discussion from IoT team.
Coming back to the demo, so, first implemented a sample app for generating Accelerometer 3D events (X, Y, Z) on Windows Phone & Windows Store devices(Universal app) & pushing the generated events as block blob to Azure Service Bus Event Hub.
Attached sample code snippet.
private async void ReadingChanged(object sender, AccelerometerReadingChangedEventArgs e)
{await Dispatcher.RunAsync(CoreDispatcherPriority.Normal, () =>
{
AccelerometerReading reading = e.Reading;
ScenarioOutput_X.Text = String.Format(“{0,5:0.00}”, reading.AccelerationX);
ScenarioOutput_Y.Text = String.Format(“{0,5:0.00}”, reading.AccelerationY);
ScenarioOutput_Z.Text = String.Format(“{0,5:0.00}”, reading.AccelerationZ);
i++;//Coordinate_X = String.Format(“{0,5:00.00}”,Coordinate_X + ScenarioOutput_X.Text);
//Coordinate_Y = String.Format(“{0,5:00.00}”, Coordinate_Y + ScenarioOutput_Y.Text);
//Coordinate_Z = String.Format(“{0,5:00.00}”, Coordinate_Z + ScenarioOutput_Z.Text);
dataDetails = i +”,”+ reading.AccelerationX + “,” + reading.AccelerationY + “,” + reading.AccelerationZ;NewDataFile += Environment.NewLine + dataDetails;
});
CloudStorageAccount storageAccount = CloudStorageAccount.Parse(“DefaultEndpointsProtocol=https;AccountName=yourazurestorageaccountname;AccountKey=yourazurestorageaccountkey”);
CloudBlobClient blobClient = storageAccount.CreateCloudBlobClient();
CloudBlobContainer container = blobClient.GetContainerReference(“accelerometer”);
await container.CreateIfNotExistsAsync();
//if (x == false)
//{
// await container.CreateAsync();
//}CloudBlockBlob blockBlob = container.GetBlockBlobReference(newFileName);
// bool y = await blockBlob.ExistsAsync();
//if (!blockBlob.Equals(newFileName))
//{
container.GetBlockBlobReference(newFileName);
// await blockBlob.UploadTextAsync(dataDetails);await blockBlob.UploadTextAsync(Headers + Environment.NewLine+ NewDataFile);
}
You can download the whole visual studio solution on Github.
Next challenge as usual is to send real sensor events to event hubs with accurate consumer key & publish millions of events to event hub at a time.
Here goes sample code snippet.
class Program
{
static string eventHubName = “youreventhubname”;
static string connectionString = GetServiceBusConnectionString();
static string data = string.Empty;
static void Main(string[] args)
{string csv_file_path = string.Empty;
install();
//string csv_file_path = @””;
string[] filePath = Directory.GetFiles(@”Your CSV Sensor Data file directory”, “*.csv”);
int size = filePath.Length;
for (int i = 0; i < size; i++)
{
Console.WriteLine(filePath[i]);
csv_file_path = filePath[i];
}DataTable csvData = GetDataTableFromCSVFile(csv_file_path);
Console.WriteLine(“Rows count:” + csvData.Rows.Count);
DataTable table = csvData;
foreach (DataRow row in table.Rows)
{
// Console.WriteLine(“—Row—“);
foreach (var item in row.ItemArray)
{data = item.ToString();
Console.Write(data);var eventHubClient = EventHubClient.CreateFromConnectionString(connectionString, eventHubName);
//while (true)
//{try
{
foreach (DataRow rows in table.Rows)
{
var info = new Accelerometer
{ID = rows.ItemArray[0].ToString(),
Coordinate_X = rows.ItemArray[1].ToString(),
Coordinate_Y = rows.ItemArray[2].ToString(),
Coordinate_Z = rows.ItemArray[3].ToString()};
var serializedString = JsonConvert.SerializeObject(info);
var message = data;
Console.WriteLine(“{0}> Sending events: {1}”, DateTime.Now.ToString(), serializedString.ToString());
eventHubClient.SendAsync(new EventData(Encoding.UTF8.GetBytes(serializedString.ToString())));}
}
catch (Exception ex)
{
Console.ForegroundColor = ConsoleColor.Red;
Console.WriteLine(“{0} > Exception: {1}”, DateTime.Now.ToString(), ex.Message);
Console.ResetColor();
}
Task.Delay(200);
//}
}}
// Console.ReadLine();Console.WriteLine(“Press Ctrl-C to stop the sender process”);
Console.WriteLine(“Press Enter to start now”);
Console.ReadLine();// SendingRandomMessages().Wait();
}
public static void install()
{
string url = @”https://…………blob.core.windows.net/accelerometer/AccelerometerSensorData.csv”;
WebClient wc = new WebClient();
wc.DownloadFileCompleted += new AsyncCompletedEventHandler(Completed);
wc.DownloadProgressChanged += new DownloadProgressChangedEventHandler(ProgressChanged);
// Console.WriteLine(“Download OnProgress……”);ConsoleHelper.ProgressTitle = “Downloading”;
ConsoleHelper.ProgressTotal = 10;
for (int i = 0; i <= 10; i++)
{
ConsoleHelper.ProgressValue = i;
Thread.Sleep(500);
if (i >= 5)
{
ConsoleHelper.ProgressHasWarning = true;
}
if (i >= 8)
{
ConsoleHelper.ProgressHasError = true;
}
}
ConsoleHelper.ProgressTotal = 0;
try
{
wc.DownloadFile(new Uri(url), @”\ASA\Sensors\Accelerometer\AccelerometerSensorData.csv”);
}
catch (Exception ex)
{
while (ex != null)
{
Console.WriteLine(ex.Message);
ex = ex.InnerException;
}
}
}
public static void Completed(object sender, AsyncCompletedEventArgs e)
{
Console.WriteLine(“Download Completed!”);
}public static void ProgressChanged(object sender, DownloadProgressChangedEventArgs e)
{
Console.WriteLine(“{0} Downloaded {1} of {2} bytes,{3} % Complete….”,
(string)e.UserState,
e.BytesReceived,
e.TotalBytesToReceive,
e.ProgressPercentage);
DrawProgressBar(0, 100, Console.WindowWidth, ‘1’);
}private static void DrawProgressBar(int complete, int maxVal, int barSize, char ProgressCharacter)
{
Console.CursorVisible = false;
int left = Console.CursorLeft;
decimal perc = (decimal)complete / (decimal)maxVal;
int chars = (int)Math.Floor(perc / ((decimal)1 / (decimal)barSize));
string p1 = String.Empty, p2 = String.Empty;for (int i = 0; i < chars; i++) p1 += ProgressCharacter;
for (int i = 0; i < barSize – chars; i++) p2 += ProgressCharacter;Console.ForegroundColor = ConsoleColor.Green;
Console.Write(p1);
Console.ForegroundColor = ConsoleColor.DarkGreen;
Console.Write(p2);Console.ResetColor();
Console.Write(“{0}%”, (perc * 100).ToString(“N2”));
Console.CursorLeft = left;
}
private static DataTable GetDataTableFromCSVFile(string csv_file_path)
{
DataTable csvData = new DataTable();
string data = string.Empty;
try
{
using (TextFieldParser csvReader = new TextFieldParser(csv_file_path))
{
csvReader.SetDelimiters(new string[] { “,” });
csvReader.HasFieldsEnclosedInQuotes = true;//read column names
string[] colFields = csvReader.ReadFields();
foreach (string column in colFields)
{
DataColumn datecolumn = new DataColumn(column);
datecolumn.AllowDBNull = true;
csvData.Columns.Add(datecolumn);
}
while (!csvReader.EndOfData)
{
string[] fieldData = csvReader.ReadFields();for (int i = 0; i < fieldData.Length; i++)
{
if (fieldData[i] == “”)
{
fieldData[i] = null;
}
}
csvData.Rows.Add(fieldData);}
}
}
catch (Exception ex)
{}
return csvData;
}
Now, built out ASA SQL query with specific window interval like in this demo, used ‘SlidingWindow(Second,no of interval)’ which generates computation on event hubs data based on the specific time interval mentioned in window.
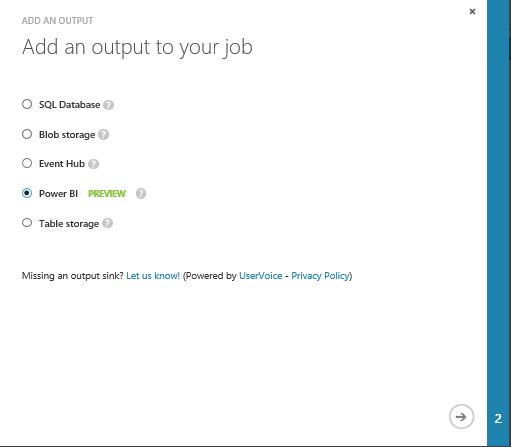
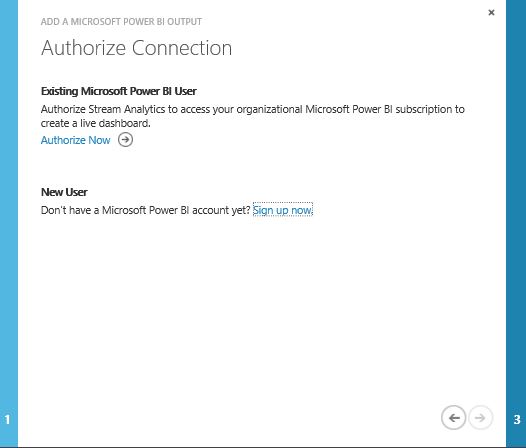
Next, start implement the processed output visualization on PowerBI preview portal by selecting ‘Output’ tab of ASA job. Once, you provide all the dataset name of output & start the ASA job, on PowerBI portal, would be able to see the specific dataset is created with a small yellow star icon beside.
Here goes a step by step demonstration with video available on my Youtube channel.


You must be logged in to post a comment.